If you’ve ever looked at a Christmas ornament and thought, “I wish I could do that” congratulations the Christmas ball candle is for you.
This holiday season, we’re turning classic tree decor into the prettiest candle you’ve ever seen: the Christmas Ball Candle. It glows like a snow globe, smells like Pear Noël, and shines with the kind of sparkle that makes your inner elf do a happy dance.
Let’s walk through the magic.
What You’ll Need
-
Christmas Ball Candle Mold — This is the foundation. It’s what gives the candle its perfect round shape (and, let’s be honest, its irresistible “ornament energy”).
-
Pillar Wax — For that solid, creamy white half. It’s sturdy, smooth, and behaves beautifully in molds.
-
Gel Wax — The secret ingredient that gives the top half its glossy, glass-ball finish.
-
White Candle Dye — Because even snow needs help looking this good.
-
Diamond Sparkle Dust — Our signature shimmer. It’s like frosting for your candle.
-
Pear Noël Fragrance Oil — Cozy pear meets a whisper of snow, vanilla, and spice.
-
Wick HTP 104 — Keep it straight. Keep it classy.
All available at Candlehaven.ca.
Step 1: Create the Base
Start with your gel wax. Pour it halfway into your Christmas Ball mold. Gel wax has a higher melt point than the Pillar wax, so you'll get a cleaner finish this way. Note that you can pour at different temperatures to get a clearer or more bubbled finisg with the gel wax. I personally like it a little bubbly.
Step 2: Add the Snow
Now for the magic. Melt your pillar wax, add you fragrance oil and pour it gently over your set base. This will be your “snow base.” Add a little white dye or sparkle dust (to taste).
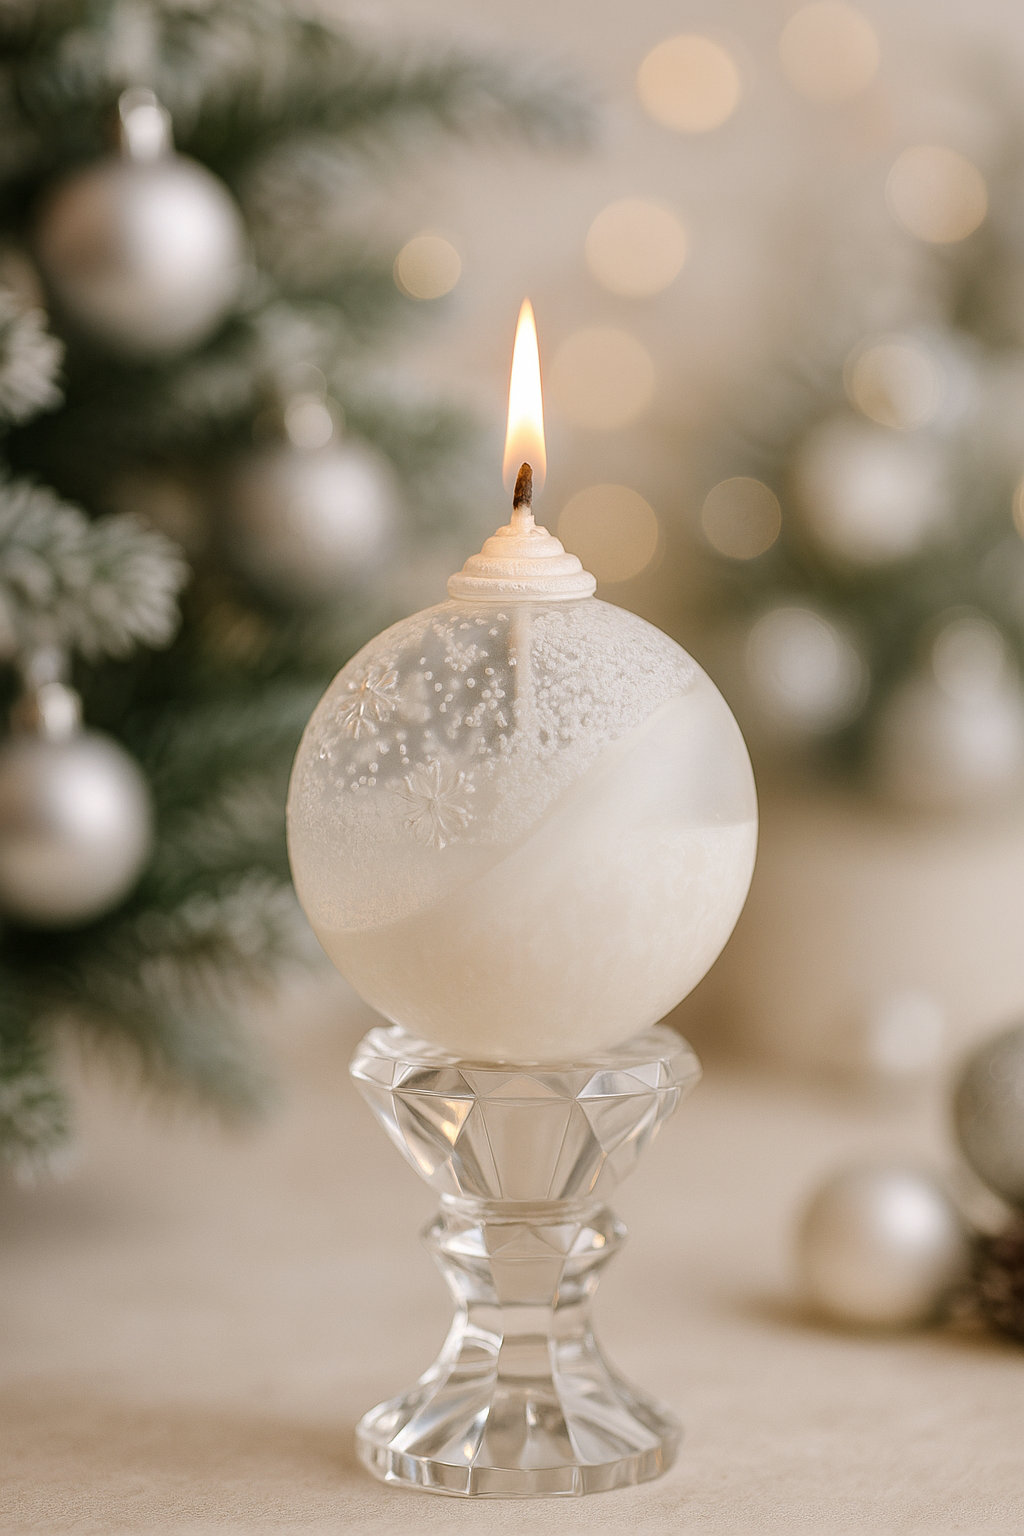
This is where you’ll see the candle transform. The gel layer turns your waxy half-sphere into something that looks like it was blown from glass.
Step 3: The Finishing Touches
Once fully set, unmold carefully. Roll the top in a fine dusting of Diamond Sparkle Dust for that “freshly frosted” effect.
When lit, the gel layer diffuses the flame like magic. The light travels through the translucent half and gives a dreamy, snow-globe glow.
Pair it with mini bottlebrush trees and faux snow on your holiday table, and you’ve got a showpiece that looks like it belongs in a luxury decor magazine.
Why This Christmas Ball Candle Sells
If you’re a maker or small-batch seller, this project is pure gold.
-
Visual appeal: The sphere shape and shimmer make it wildly photogenic (hello, viral Reels).
-
Scent appeal: Pear Noël is sophisticated but nostalgic. It's the perfect balance of modern holiday and cozy tradition.
-
Profit margin: With a low material cost and luxury look, it’s a bestseller at Christmas markets and online shops.
Pro tip: List it as a “Snow Globe Candle” or “Holiday Ornament Candle” to capture both decor and gift buyers.
Maker’s Hack: Perfecting the Gloss
If your gel wax looks cloudy, it’s likely the temperature or mixing speed. Keep your pour steady and slightly hotter than your base wax so the layers fuse seamlessly. A quick hit with a heat gun can help smooth imperfections.
Bundle These Supplies on Candlehaven.ca
Create a product kit for your customers or yourself:
-
Christmas Ball Candle Mold – Large
-
Pillar Wax – Premium Soy/Paraffin Blend
-
Gel Wax – Crystal Clear
-
Pear Noël Fragrance Oil
-
White Candle Dye Chips
-
Diamond Sparkle Dust (Silver Frost)
Bundle savings + free shipping threshold = the ultimate Christmas treat.
Why Candlehaven Supplies?
Because every great candle starts with great ingredients.
Candlehaven only sells high-quality, candle-safe supplies tested by real makers (not mystery waxes from sketchy sellers). We’re proudly Canadian, shipping coast to coast, and we stock everything you need for both hobby and professional candle making.
Final Thoughts
This project isn’t just a candle...it’s a mood. A vibe. A tiny glowing snowball of holiday joy.
And when your customers or friends see it, they’ll swear you bought it from a luxury boutique.
Head to Candlehaven.ca to grab your sphere mold, waxes, dye, and sparkle dust. Then go forth and light up the holidays.
Check out our video tutorial here